Thursday, May 20, 2010
Redox Lab
Purpose:
To determine the number of grams of copper that will be produced from an oxidation reduction reaction when you know the mass of Aluminum that reacted with a known amount of copper II sulfate pentahydrate and to compare this to the actual yield of copper.
Background Info:
1. Limiting Reactant is a reactant that is used up first and thus limits the amount of other reactants that can participate in a chemical reaction. The limiting reactant also limits the amount of product that can be formed.
2. Actual Yield is how much of the product is actually obtained.
3. Theoretical Yield is the mass of product expected from stoichiometric calculations
4. Percent Yield describes how close the actual yield is to the theoretical yield.
Hypothesis:
We think that when we mix the two together and filter it there will be a chemical reaction that makes a precipitate.
Materials:
1. 8.10g of Copper II Sulfate
2. 0.43g of Aluminum
3. 75 mL of H2O
4. Glass Stirring Rod
5. Iron Ring w/asbestos pad over it
6. Bunsen Burner
7. 100 mL Beaker
8. Flask
9. Filter Paper
10. Weighing Paper
11. Our Required Safety Gear
Procedure:
1. Obtain medium sized beaker
2. Add 75 mL of water to beaker; set-up iron clamp with asbestos pad over a bunsen burner to begin heating
3. Measure out about 8 to 10g of Copper II Sulfate Pentahydrate and record the mass in the data table. Then slowly add the crystals to the heating water.
4. With a glass stirring-rod, stir the solution until the Copper II Sulfate Pentahydrate is dissolved.
5. While the copper Sulfate crystals are dissolving one member of the group can go and get the foil. Carefully weigh out a piece of aluminum foil that weighs between .4 and .7 grams. Record the mass into a data table.
6. Tear the foil into small pieces and carefully add it to the hot solution with continuous stirring until all the foil is placed into a beaker.
7. Stirring frequently allow the re3action to occur until you can't see any more silvery foil pieces. This will take 15 to 20 minutes so be patient. Once you can't see anymore foil pieces no matter how small, heat an additional 3 to 4 minutes, then remove from the heat.
8. Write your names around the outside edge of a filter paper weigh and record the mass in the data table.
9. Use the filter paper and your funnel to filter the residue in the beaker, catching the filtrate into the Erlenmeyer flask provided.
10. Rinse out your beaker with a small amount of water to be sure you obtained all of the product/residue.
11. Remove the filter paper from the funnel and spread it out on a paper towel to dry overnight.
12. Clean and dry the glassware. Be sure the propane is turned off and Bunsen burner disconnected and put away. Straighten up your are.
13. Upon returning the next day. Weigh the filter paper and dry residue and record that mass in the data table. Throw the filter paper and residue away.
Results:
In our lab the reaction didn't occur like everyone else' s.
Thursday, March 18, 2010
Reaction Types
Introduction
Types of Reactions
To help us better understand and observe chemical reaction types.
Procedure
Balanced Equations
In the first reaction we knew that it was a single displacement because Zinc and Copper switch places. This shows that it is single displacement because in this type of reaction one metal takes the place of another. In the second reaction it is double displacement because the cations switch places with each other or the anions switch places with each other. In the third reaction It is another single displacement because Magnesium takes the place of hydrogen. In the fourth reaction we know that it is combustion because the products are CO2 and H2O. In the last reaction we know it is decomposition because one complex compound breaks down into two more simple compounds.
Types of Reactions
- Synthesis-Two or more substances combine into one
- Decomposition-Compound breaks down into simpler elements
- Single Displacement-One element takes the place of another
- Double Displacement-Positive and negative cations switch places
- Combustion-Carbon and Hydrogen combine quickly with Oxygen
To help us better understand and observe chemical reaction types.
Procedure
- Obtain 3 small test tubes.
- In the first test tube, place a piece of zinc and about 1/2 mL of CuSO4 solution. Record observations.
- In the second test tube add about 1/2 mL Ba(NO3)2 solution to about 1/2 mL of CuSO4 solution. Record observations.
- In the third test tube place a piece of magnesium ribbon. Add about 1/2 mL of HCl solution. Record observations.
- Light a bunsen burner (burning propane gas, C3H8). Record observations of the flame.
- Rinse out the first test tube. Add about 2 mL h2o2 solution. Lightly heat it. Record observations.
- Add a pinch of MnO2 (catalyst to the H2O2 solution Lightly heat it. Record observations.
Gas | Precipitate | |||
ZnCuSO4 | We observed the solution started to bubble which means that a gas was given off. | We observed that given about a half an hour this solution formed a copper colored precipitate. | ||
Color Change | Precipitate | |||
Ba(NO3)2 | We noticed a change in color almost instantly when the compound was created. | We observed that in about five minutes there was a white powder that formed in the tube. | ||
Gas | Hydrogen Gas | |||
MnHCl | We observed that there was a gas being given off when this started to bubble. | We lit a stick and held it over the tube when it bubbled and listened to the pop. | ||
Fire | Smell | |||
C3H8 | We turned the gas on the bunsen burner and lit it and observed that the flame was blue. | The odor we observed smelled like propane (duh) and it was gross. | ||
Gas | Boil | |||
H2O2 | We observed when placed over a flame came to a rapid boil very quickly and gave off a lot of steam. | This solution came to a boil in about 5 seconds or maybe even less than that. | ||
Gas | Color | |||
H2O2MnO2 | This solution came to a boil then it made very large sticky bubbles which came out of the tube. | When mixed together this solution turned all black and it made bubbles that didn’t break easily. | ||
Balanced Equations
- Zn+Cu(SO4)=Cu+Zn(SO4) (Single Displacement)
- Ba(NO3)2+Cu(SO4)=Ba(SO4)+Cu(NO3)2 (Double Displacement)
- Mg+2HCl=H2+MgCl2 (Single Displacement)
- C3H8+6O2=3CO2+12H2O (Combustion)
- 4H2O2=4H2O+2O2 (Decomposition)
In the first reaction we knew that it was a single displacement because Zinc and Copper switch places. This shows that it is single displacement because in this type of reaction one metal takes the place of another. In the second reaction it is double displacement because the cations switch places with each other or the anions switch places with each other. In the third reaction It is another single displacement because Magnesium takes the place of hydrogen. In the fourth reaction we know that it is combustion because the products are CO2 and H2O. In the last reaction we know it is decomposition because one complex compound breaks down into two more simple compounds.
Wednesday, February 24, 2010
Friday, February 19, 2010
Polaritry and Molecular shape lab w/ Lewis Dot structures
Objectives
Results:
See Shape Lab(Photos)
Conclusion:
Molecules polarity are determined by their shape, and electronegativity. The shape is determined by the number of different repelling groups.
See photos @:
http://lhschem56.blogspot.com/2010/02/lew-structure-shape-labphotos.html
- Construct models of molecules.
- Determine molecular shapes.
- Predict polarity of molecules.
- Molecular model kit.
- Black- Carbon, Nitrogen and Silicon.
- White- Hydrogen
- Red- Oxygen
- Green straw- Covalent bond
- Green- Halogens
- White straw- Double bonds
- Pink- Iodine and Selenium
- Grey- Sulfur
- Blue- Boron
- Build a model for each of the molecules listed on the data table on the back of this page. (Remember that some atoms can form multiple bonds.)
- Draw the three-dimensional structure of each molecule in Table 1. (Make a copy of Table 1 on your own paper) Use solid lines to represent bonds in the plane of the paper, dashed lines for bonds that point back from the plane of the paper, and wedged lines for bonds that point out from the plane of the paper toward the viewer.
- Note the shape of each molecule in the third column of Table 1, the bond angles in, whether or not they will be polar, and whether or not they exhibit resonance structure.
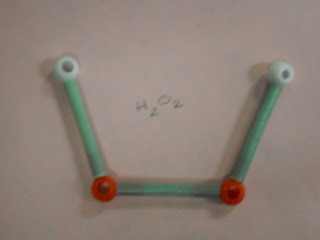
- Water's shape causes it to be polar because the water molecule has a negative and positive end, which helps the molecule stick to itself.
- Water's properties would be different if the molecules were different because, they wouldn't stick to each other as well.
- The molecules that are water-soluble are:
Results:
See Shape Lab(Photos)
Conclusion:
Molecules polarity are determined by their shape, and electronegativity. The shape is determined by the number of different repelling groups.
See photos @:
http://lhschem56.blogspot.com/2010/02/lew-structure-shape-labphotos.html
Thursday, February 4, 2010
Testing Polar/NonPolar Solvents
What are the polarities of the given solvents?
Materials:
The 4 Solvents
Inks
Chromatography Paper
Well Plate
Goggles
Apron
Journal(Notes)
Safety Concerns:
Due to the nature of Methane and Hexane you need to be sure that you wear goggles and an apron. Also while working with the solvents makes sure to keep them under the fume hood. Because these fumes are a lung irritant keep your head our from under the fume hood to prevent a head ache. These fumes are a eye irritant that is why the goggles are a necessary precaution. Store the chemicals in proper room. After being dispensed in a well plate put them immediately under the fume hood.
Procedure:
After gathering our materials and putting on our safety equipment we drew three bold black dots on all the pieces of paper and places each one in a different solvent.We had the solvents in four different wells of the well plate and we only had one of each. As we waited we watched the colors being pulled up the paper. We let the paper sit in the solvent for 30 minutes. The next day we picked the best solvent which was water and we used different colored pens to see which color got pulled the farthest and got its colors most separated as it went up the paper. We used the same procedure on each day.
Results:
On the first day we found out that water separated black the better than methane, isopropyl, and Hexane. So the second day we used water as our primary solvent and added colored markers. We used water since it was the best solvent to test which colors separate and which colors are pure. The colors we used were red, purple, green and orange. We found that purple and red are pure colors, and that yellow and orange separated into a mixture of colors.
Conclusion:
Our hypothesis was supported in the results of our experiment. We hypothesized that the most polar solvent would be water, then isopropyl, methane, and the least polar hexane. To make this lab more accurate we could have done the procedure more than once. One weakness in our lab was that the chromatography paper didn't sit in the solvent for exactly 30 minutes.
- The more polar the solvent the more the ink will be pulled up the chromatography paper.
- As the ink is being pulled through the chromatography paper the colors that make up that color are separated out. If the colors are pure they will not separate.
Materials:
The 4 Solvents
Inks
Chromatography Paper
Well Plate
Goggles
Apron
Journal(Notes)
Safety Concerns:
Due to the nature of Methane and Hexane you need to be sure that you wear goggles and an apron. Also while working with the solvents makes sure to keep them under the fume hood. Because these fumes are a lung irritant keep your head our from under the fume hood to prevent a head ache. These fumes are a eye irritant that is why the goggles are a necessary precaution. Store the chemicals in proper room. After being dispensed in a well plate put them immediately under the fume hood.
Procedure:
After gathering our materials and putting on our safety equipment we drew three bold black dots on all the pieces of paper and places each one in a different solvent.We had the solvents in four different wells of the well plate and we only had one of each. As we waited we watched the colors being pulled up the paper. We let the paper sit in the solvent for 30 minutes. The next day we picked the best solvent which was water and we used different colored pens to see which color got pulled the farthest and got its colors most separated as it went up the paper. We used the same procedure on each day.
Results:
On the first day we found out that water separated black the better than methane, isopropyl, and Hexane. So the second day we used water as our primary solvent and added colored markers. We used water since it was the best solvent to test which colors separate and which colors are pure. The colors we used were red, purple, green and orange. We found that purple and red are pure colors, and that yellow and orange separated into a mixture of colors.
Conclusion:
Our hypothesis was supported in the results of our experiment. We hypothesized that the most polar solvent would be water, then isopropyl, methane, and the least polar hexane. To make this lab more accurate we could have done the procedure more than once. One weakness in our lab was that the chromatography paper didn't sit in the solvent for exactly 30 minutes.
Subscribe to:
Posts (Atom)